Apples

These images of apple are from the day when I was trying to take some abstract shots from some usual objects. I had experimented to capture a couple of stuff, such as rubber bands, bubbles, CDs, water drops and an apple, and those shots I like the most are of the apples.

I really love the composition of the apple and lamp because it is a kind of minimalism. The white lamp and the deep red apple are not totally shown in the image. Their shadows mixed the dark background makes their visible parts standing out in the image. The white and red also create a high contrast that makes the image even more interesting.


This is the shot of the apple and the lamp taken from another angle. I like this one too, but not as much as the one in above. It is a bit too much in the term of minimalism.


This one is an experiment of reflections. It was a quick study of how to use a CPL filter to increase or reduce reflections. I described that was a study but this was just a very simple thing. What you need to do the increasing and reducing reflections is to adjust the ring of the CPL filter. And then you will realize how people get a clear reflection of landscapes from river surfaces.

Less reflections

More refections


Cubes!

Not sure what I should do for this year, so I am still experimenting my ideas. This idea of cube is based on my previous project from last academic year.

These two image in above are of the works I made last term and exhibited at Cavendish Bar. The title is The Odd City II, I am not going to explain it here. And The ODD City I is here.

My recent made cube works are over here.


eBank Portable Studio Kit Testing

I have been wanting a soft box for a long time. While browsing on eBay, I saw this auction for an used eBank Studio kit. From the other sellers, the same item is sale for more than £30, and I only spent £11 to win the auction. So great!

The whole package comes with a fold-able soft box, two spot lights and a mini tripod. It was a very bargaining purchase, although the spot lights and the mini tripod are not quite useful to me.

At the beginning of testing this studio kit, I used the spotlights to take a few pictures of my cameras. My feeling is the spotlights are okay but not bright enough and I had to use ISO400 or even ISO 800 to avoid blurred pictures.

These photos in the bottom were taken using my flashguns, one attached on the camera and the other two on the left and right side on the soft box. They were much brighter than the spotlights and let me stop down the level of ISO. I could use lower ISO as 100 to keep the image in the highest quality.

However, there are still a disadvantage of using flash lights. That is you are able to see the result of your setting immediately. You need to check the photo in the camera after the shot, and then you adjust the setting of the flash lights. You keep doing this until you get the best result.


Looking for water drops

It is very good to have a macro lens, because the world seems suddenly being bigger. There are more interesting things for me to shoot.

Today, I went to the country park and looked for dew. I carried my DSLR with the 100mm macro lens on and the tripod. Taking the tripod with me is because when you take a picture of a tinny object with a macro lens, only a little movement would make the object that you want to capture out of focus. Therefore, the tripod is used to keep the camera in the same position. However, using a tripod would also make you less portability. And also it didn't really help me from the leaves being blown by the wind. Here are some of the shots I like.

A ladybug on the withered leaf looks big in the image, but it actually is so tinny.

Amsterdam photographer Kim Boske's works are quite inspiring. She is fascinated by the passing of time. She likes to take several or a lot of picture of a object throughout a time, then combines them into one image. The image shows the change of the object during the time. I quite like this idea and I tried one today.

I took several pictures of a tree. I used this tree is because it is the only one standing on its own. That means it is easy to experiment the idea. I combined all the pictures into one image which is in above. As today was not windy at all, the tree didn't move that much in a minute. Thus, the image looks more like a normal photo.


More water drops on the CD

Finally, I have got a proper macro lens for my DSLR. It is a Canon EF 100mm f2.8 Macro lens. After receiving the lens, the first thing to do was to use it to take some photos of water drops on CD. The result of the image is impressively amazing. I regretted that I've got a macro lens so late. The super close-up distance enlarged the size of the water drops in the images. With the 100mm arrow view angle, I could focus on the area where I would like to capture. That saved my time to do the cropping and kept the quality of the images.

Tried to do a long exposure light-painting with laser light, but not good


Another Gundam Images

This is the 1/100 Gundam RX78 model that I brought from Hong Kong to the UK. It is another flash shot of this kind of model using the way as last time's flash experiment. Although I had a bit experience of using those flashgun, I still took a couple of time to get the right exposure.

On the right side of the model, it is a bit too bright. The whole body is unlike the last picture that I like with shadows which highlight the constitutive body. However, I am still please with this one. After taking many pictures, this one is the best one to show the reflection of the little camera that it is holding. I used Adobe Lightroom to change the colour from purple to blue, that makes the image looks smarter.


Water Drops

As my new project's starting point is surrealistic and abstract photography, recently, I am still experimenting with different objects and photographic techniques. This time, I am trying to take some pictures of water drops.

Taking pictures of water drops on a CD is a technique that I learned from a on-line photographic forum. When you use a torch or a light shine on the CD surface, the rainbow colour would come out through the reflection. With some water drops on the CD, the scene would become more beautiful because the colourful lights reflected and refracted by those water drops.

I took those pictures using my Canon compact, PowerShot G9 which could give me a 1cm close-up macro shot. However, the 1cm close-up function is only able to be used in wide open 35mm angle, therefore I also captured some objects those I do not want in the image, such as the edge of the CD. And I had to crop the images to make the water drop as the focal point.

A long exposure to capture the laser light's movement


Moving Candle Image


This is my first try after seeing Jamie Beck's Cinemagraph. My method was to use continuous shooting to take several images of the candles. I then put them on Photoshop, left the first picture as the whole background of the scene, and then cut the middle candle out from the other pictures and placed them into different layers. The final step was to use Ulead Animator to make those layers to be animation.


Self Portrait for this year

Pretty look like a traditional painting, yea? I did that on Photoshop with a picture of myself. How to do it? I need a good photograph of myself. First, I set up my bedroom to be a photographic studio. And again, I needed to use my wireless flash triggers.

This was my setting. The camera collected with the main flashgun and the flash transmitter. On the right, it is a little flashgun which can be trigger by other flash mounted on the stand and it is collected with the reflecting umbrella. The little flashgun flashes in the umbrella and the light would be reflected by the silver surface. That would give the object a soft light.

My position was in front of the reflector. (Spent a long time to set the height of the reflector to match the height of head) At behind the reflector, there are a tripod with another flashgun mounted on. Now you know what I was going to do. That's right! A pure right background! You might ask I was taking some passport photos. No, it was not supposed to be like passport photos, but those pictures do look like passport photos. Fine than, I chose one and made it like a painting than. After about 2 hours work, the "painting" is done.


Actually, what I want to achieve is a explosion effect coming out from the edge of my face. However, what is the problem? Why does it look like a passport photo? I think the first problem is the setting. Only one flash behind me was not enough to produce a strong light to get the explosion effect, as I am not small as my little gundam models. Anyway, I need to do more experiments. At least, I can do some passport photos at home and I can save my money from those passport photo machines.

Wireless Flashing Experiment

I have got a new wireless flash device in this summer, which is Phottix Strato II. I love some product photograph with a pure white background, so I tried to take some pictures like that with my little gundam model using my flash device.

I have already had a very cheap wireless trigger made by Yongnuo, which is super unstable, It sometime works, sometime does not, so annoying. Choosing Phottix Strato II was because it work is fine and is much cheaper than the wireless trigger made by Canon. Although I have not had another receiver to play the multiple group flash, after I used for a night, I think it is so much batter than the cheap Yongnuo device.

I do not have a big white fabric, so I use my circle reflector as the background and my gundam models were put on it. A flashgun was put under the reflector. I was also holding another little flashgun which can be triggered by other flash to light the models' front.


After taking a lot of pictures, I finally got one that I am happy with. Most of the fails were over exposure or the background not white enough. The one at below is just right. The background is what I wanted. The shadow of the model highlights the shape of the structure. And the reflection from the eye brings the spirit to the gundam model.


Landscape in New Zealand

I went to New Zealand in the last summer with my dad to visit my cousin, Andy and his family. I was quite looking forward to be there to experience New Zealanders' living style or the difference between them and English in the UK. However, I was a bit disappointed to see lots of Chinese in the capital, Auckland where I lived in New Zealand. That made me completely out of motivation to take pictures.

However, in the trip to South Island of New Zealand, my motivation of taking pictures was back. I smiled the fresh air and it is totally different to the air on North Island. South Island seems a place where has not been polluted yet and I really love this place.

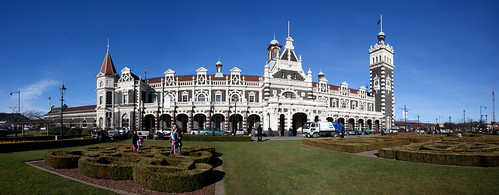
Dunedin Railway Station
A panoramic shot taken on Canon 5D Mark II and Composed on Photoshop


Goat Island, ND filer fail

When I received my ND filter, I thought it was a powerful equipment to block the sunlight to help me to get a flowing water effect in images. I used the filter in the trip to Goat Island, where is a lovely seaside. During I tried to capture the flowing water on the beach, I found out that the filter did not help me to stop down the shutter speed so much and also gave me a cross right in the middle of the image. After I got home, I searched for information about ND filters. I realised that the cross always appears when you try to use the filter on a ultra wide lens a
nd take the fade too far. And also, my ND filter can only take 8 stop operating range, so it does not help me to get a very slow shutter speed without over exposure under the sunlight.

Moeraki Boulder

The shot of Moeraki Boulder is my favourite photo from the whole trip and It was probably my first success using the ND filter. Since I found the interest of this traditional photographic technique of long exposure, I started to look for "water" in the trip.